'%3e%3cpath%20fill-rule='evenodd'%20clip-rule='evenodd'%20d='M20.8132%206.92899C20.4185%208.95455%2019.4773%2010.6078%2017.9899%2011.8885C16.5022%2013.1696%2014.7858%2013.81%2012.8407%2013.81C12.7649%2013.81%2012.3949%2013.7965%2011.7307%2013.7697L12.4992%209.82624H13.1055C15.3034%209.82624%2016.5905%208.86049%2016.9669%206.92899C17.3223%205.10505%2016.4201%204.19271%2014.2601%204.19271H12.9906L11.1283%2013.7496H7.37668L9.99181%200.329712H14.8802C17.116%200.329712%2018.7618%200.926766%2019.8176%202.12037C20.8734%203.31439%2021.2053%204.91702%2020.8132%206.92899ZM7.94083%203.95127C7.65015%203.95127%207.37857%204.04877%207.1261%204.24301C6.87323%204.43766%206.71312%204.70928%206.64523%205.05786C6.58247%205.37977%206.62036%205.73539%206.75947%206.1242L6.94176%206.64732C7.27136%207.61307%207.34612%208.55869%207.16581%209.4842C6.93315%2010.6782%206.29644%2011.7245%205.25623%2012.6229C4.21578%2013.5217%203.05147%2013.9709%201.76305%2013.9709C1.11883%2013.9709%200.549861%2013.8433%200.0565186%2013.5886L0.813229%209.70552C1.10976%209.9338%201.42862%2010.0476%201.76968%2010.0476C2.08531%2010.0476%202.36328%209.95048%202.60336%209.75582C2.84312%209.56158%202.99344%209.31008%203.0536%209.00133C3.08233%208.85395%202.98365%208.45156%202.75826%207.79414C2.40876%206.73475%202.33628%205.68157%202.5402%204.63534C2.78581%203.37475%203.42062%202.28829%204.44481%201.37594C5.4686%200.464012%206.56826%200.00779629%207.74299%200.00779629C8.27352%200.00779629%208.76805%200.0952334%209.22673%200.269353L8.47791%204.11223C8.22078%204.00509%208.04181%203.95127%207.94083%203.95127Z'%20fill='%233b82f6'/%3e%3c/g%3e%3cdefs%3e%3cclipPath%20id='clip0_4_3'%3e%3crect%20width='21'%20height='14'%20fill='white'/%3e%3c/clipPath%3e%3c/defs%3e%3c/svg%3e)
As a leading provider of digital seal solutions , we explore topics related to round-stamps.
Round Stamps: A Practical, Design-First Guide
Round stamps are everywhere—on contracts, packaging, certificates, event swag, and even social content. But designing one that is clear, balanced, and production-ready is trickier than it looks. This guide distills what matters: sizes that actually exist, artwork rules that won’t blur in ink, what hardware to pick, and how regulations differ by region—so you can create a round stamp that holds up in real life, not only on a screen.
1) Why choose a round stamp?
- Natural hierarchy: Circular layouts make it easy to place a brand or emblem in the center and wrap key info (name, city, year) around the perimeter.
- Recognition: Round imprints are strongly associated with authenticity and approval, which is why many organizations pick them for seals and date stamps.
- Hardware alignment: Popular self-inking and pre-inked models are built specifically for round imprints (commonly 40–45 mm), which simplifies procurement and replacement.
Read More:-Online Stamp Maker Tools: Complete Guide 2024
2) The sizes you’ll actually find (so your design fits the mount)
Manufacturers publish impression diameters. Two of the most common workhorse round sizes are 40–42 mm for office use and logos, often allowing several lines of curved text with a center mark. Design to the actual impression size rather than the headline device body size.
- Expect a tiny margin deducted from the plate edge (≈ 1 mm total) to prevent ink flooding at the border.
- Start your canvas at the impression diameter (e.g., 42 mm at 600 dpi), then keep text at least 1 mm from the outer ring.
3) Artwork that stamps cleanly (without filling in)
Ink spreads. Paper fibers vary. To avoid muddy results, prepare artwork with conservative minimums and print-first thinking.
- Resolution: Work at 300–600 dpi; 600 dpi gives safer edges for curves and small type.
- Minimum text size: Aim for ≥ 7–8 pt (varies by typeface and weight).
- Stroke thickness: Keep ≥ 0.25 mm (≈ 0.7 pt) on the conservative end; some shops recommend up to ~2 pt—ask your vendor and test if pushing detail.
- Keep it solid: Use pure black artwork (no grayscale) for masters; avoid white-on-black reverse micro-type, which tends to fill in.
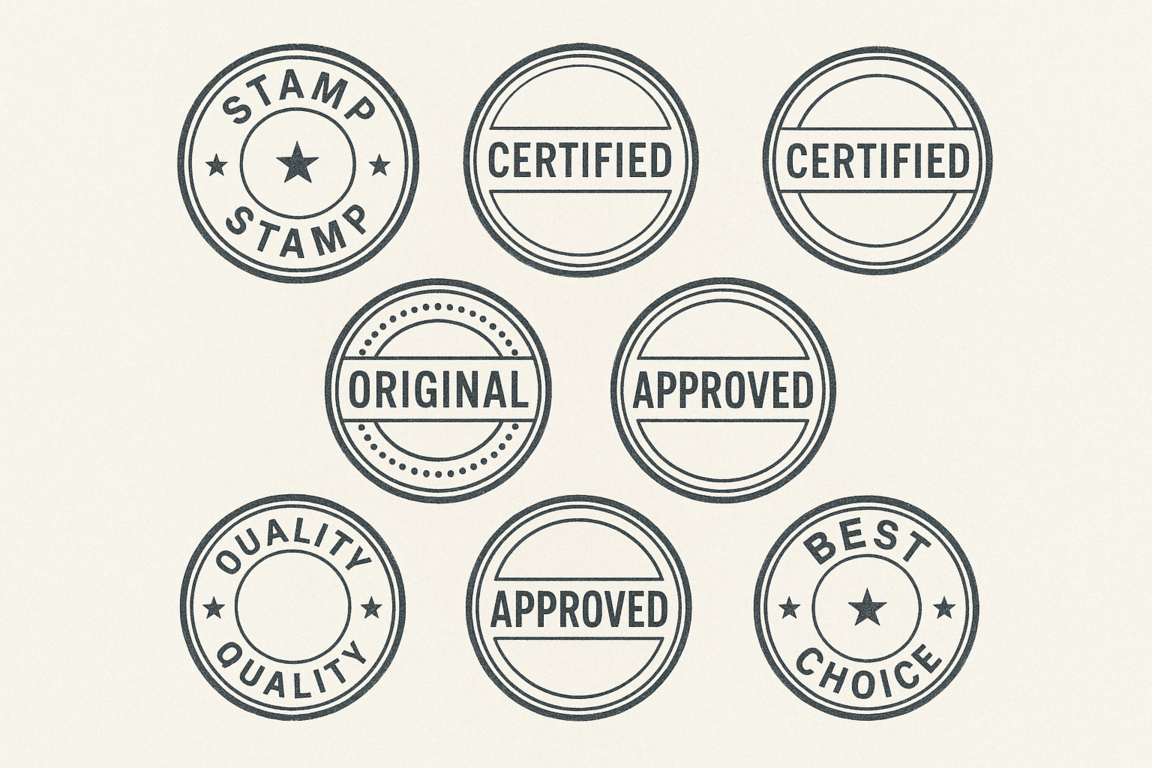
4) Building the classic circular layout (that actually reads)
- Outer ring(s): Use one or two strokes, with the thinnest ring on the outside. Maintain at least 0.5–0.75 mm between concentric rings so they don’t merge on soft paper.
- Perimeter text: Split into top and bottom arcs as separate text objects. Slightly increase letter-spacing on tighter arcs. Use separators (• or ★) at the joins to hide spacing artifacts. Flip the bottom path so characters aren’t upside-down.
- Center mark: Keep the middle simple—monograms, a short motto, or a date circle. Detailed crests usually need a larger diameter to stay legible.
Read More:-Financial Digital Seals: Advanced Security Solutions for Banking 2024
5) Choosing the right stamp hardware (and when it matters)
Round designs can be produced on different mounts, but the day-to-day user experience changes with the hardware.
- Self-inking: Built-in pad; fast and consistent; ideal for high-volume office use.
- Pre-inked: Finest detail and darkest impressions; best for small type or intricate logos.
- Traditional wood handle: Most flexible with specialty inks and textures; slower and requires a separate pad—great for craft packaging or porous materials.
- Rule of thumb: If you expect thousands of repetitive imprints (received/approved/date), pick self-inking. If your art includes tiny serif text around a 35–40 mm circle, pick pre-inked.
6) Ink choices: not all pads behave the same
- Dye-based inks: Soak into paper and dry fast—good for office papers and self-inking units.
- Pigment inks: Sit more on the surface—richer color but longer dry times; common for crafting or textured cards when using separate pads.
- Pad construction: Felt/foam density and quality affect edge clarity over longer runs; higher-quality pads keep lines sharper.
7) What about “legal” round company seals?
Rules differ by jurisdiction. Many common-law countries no longer require a company seal for most documents, though some businesses keep them for tradition or fraud deterrence. In parts of East Asia, round company chops can carry significant legal weight and must be controlled carefully. Always validate local practice before assuming a stamp is sufficient for formal authorization.
8) Common mistakes (and quick fixes)
- Perimeter text dips into the ring: Increase the inner margin from border to baseline to ≥ 1.5–2 mm; if space is tight, shorten wording before shrinking the size.
- Center emblem blurs: Simplify shapes, remove micro-gaps < 0.25 mm, and avoid reversed micro-type.
- Edge kiss at print: Your rings are too close or too thin; widen spacing or thicken strokes.
- Mismatch with hardware: Designing for 45 mm but ordering a 42 mm device causes reflow—always check the impression spec before exporting.
9) Export checklist (production-ready)
- Set the canvas to the exact impression diameter (e.g., 42 mm at 600 dpi).
- Use black-only artwork; avoid anti-aliasing in vector exports.
- Text ≥ 7–8 pt; strokes ≥ 0.25 mm–2 pt depending on vendor tolerance.
- Keep a ≥ 1 mm safe area from the outer border to the nearest element.
- Provide SVG/PDF (vector) for laser production when possible; PNG 600 dpi for previews and mockups.
10) Round stamp FAQs
- Q: Is 40–42 mm big enough for a company name + city + year? — A: Usually yes if wording is concise and the center emblem is simplified.
- Q: My curved text looks uneven—what am I doing wrong? — A: Use two separate text paths for top and bottom, add slight tracking on tight arcs, and center with small separators so the joins aren’t obvious.
- Q: What file format should I send to a stamp shop? — A: Vector (SVG/PDF) whenever possible; otherwise a single-color bitmap at 600 dpi. Avoid grayscale and tiny reverse text.
- Q: Which mount gives the crispest small type? — A: Pre-inked typically wins for micro-details; self-inking wins for speed and consistency in daily office tasks.
- Q: Are round seals still legally required? — A: It depends on your region. Many places don’t require them, while others still rely on company chops. Check local guidance.
11) Final takeaway
A successful round stamp balances readability, geometry, and manufacturing reality. Design to the impression size you can actually buy, respect ink-friendly minimums, and pick hardware based on whether you need detail (pre-inked) or throughput (self-inking). If your stamp must serve as a formal seal, confirm local rules before relying on it.
Want to learn more about digital seals? Visit Digital Seal Studio's homepage for more professional insights.